How to Build a Stunning Media Wall on Any Budget
A media wall has evolved from a simple television mount into a defining architectural feature—one that anchors a room, enhances entertainment, and reflects personal style. Whether you’re working with a modest apartment budget or designing a high-end living space, building a stunning media wall is less about spending power and more about strategic planning, thoughtful materials, and layered design. When executed properly, a media wall transforms a blank surface into a cinematic focal point that integrates technology, storage, lighting, and décor into one cohesive visual statement. The good news is that you can achieve this transformation at virtually any price point with the right approach.
What Is a Media Wall and Why It Matters
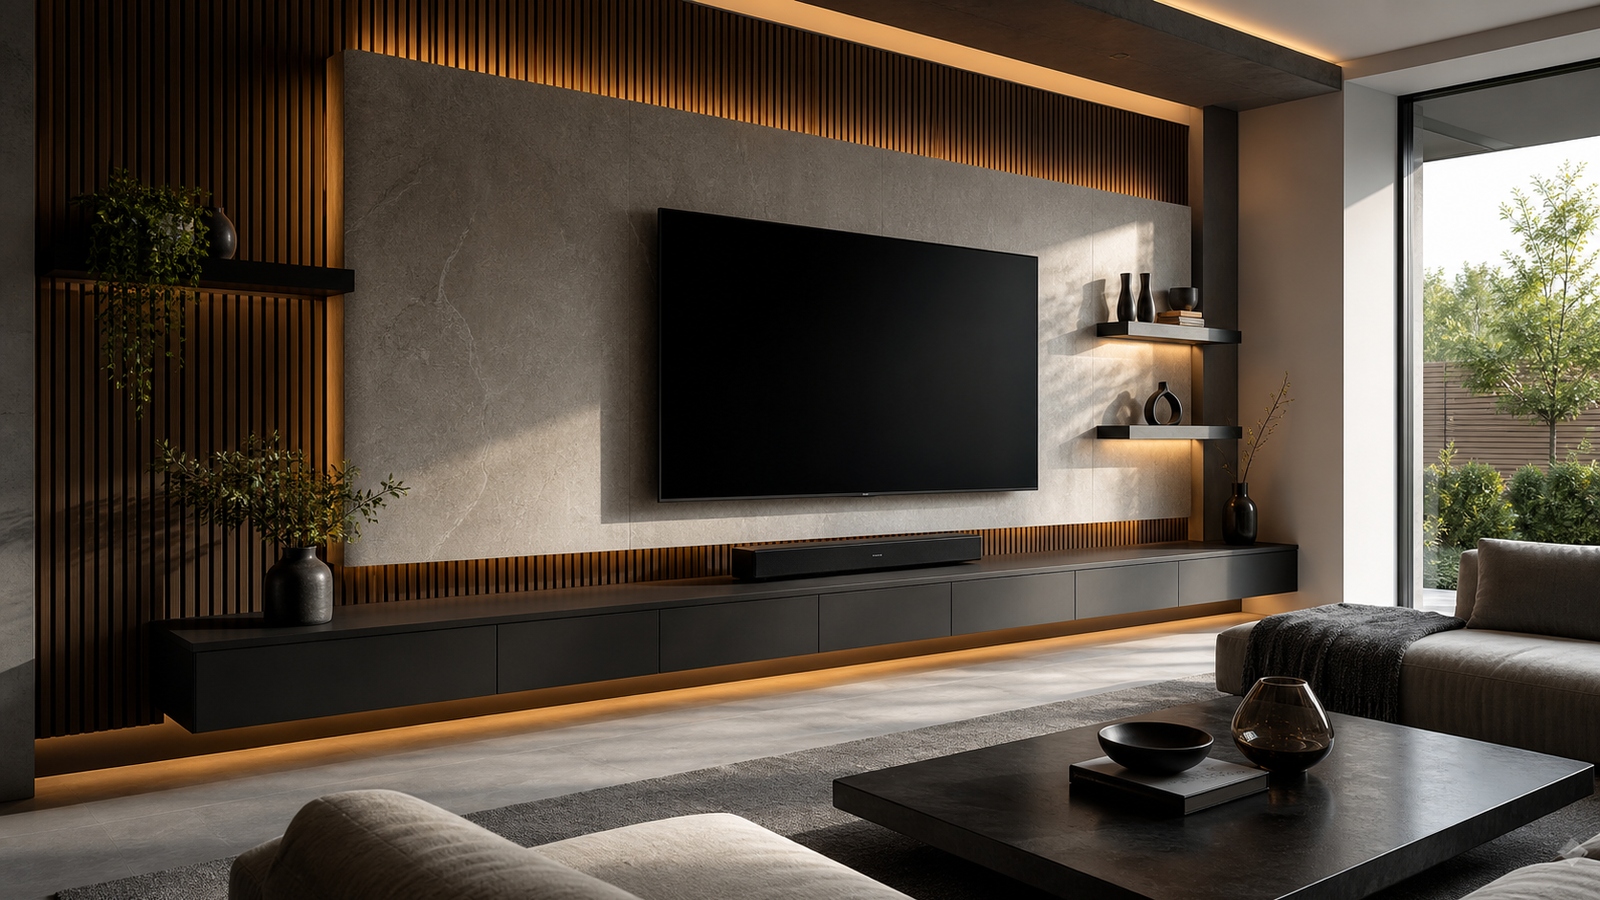
A media wall is a purpose-built feature wall designed to house a television, speakers, consoles, storage units, and often a fireplace or decorative elements. Unlike a standard TV stand setup, a media wall integrates components into the architecture of the room, creating a streamlined, built-in look. From minimalist floating shelves to floor-to-ceiling custom cabinetry, the design spectrum is vast.
Beyond aesthetics, a well-designed media wall improves cable management, optimizes viewing angles, enhances acoustics, and increases property appeal. In open-concept homes especially, it defines zones and creates a visual anchor in large spaces. For smaller rooms, it consolidates storage and entertainment into one efficient footprint.
Step One: Define Your Budget and Scope
Before choosing materials or design styles, establish your financial framework. Media wall budgets typically fall into three tiers: entry-level DIY builds, mid-range custom upgrades, and premium architectural installations.
On a tight budget, you might rely on paint, wall-mounted shelves, LED lighting strips, and a floating TV mount to create a clean and modern appearance. A mid-range budget opens the door to custom cabinetry, textured panels, electric fireplaces, and integrated lighting systems. At the higher end, you can explore full wall cladding, acoustic treatments, recessed niches, premium wood veneers, and professional installation.
Defining scope early prevents design creep. Decide whether your goal is purely aesthetic, storage-driven, entertainment-focused, or a combination of all three. Clear objectives guide every subsequent decision.
Step Two: Choose the Right Wall
Not every wall is ideal for a media installation. The best location typically offers minimal glare from windows, sufficient electrical access, and a comfortable viewing distance. As a general rule, the optimal viewing distance for a 65-inch TV is approximately 8 to 10 feet, while larger screens require more depth.
Consider traffic flow as well. The media wall should not obstruct pathways or dominate a room awkwardly. In smaller homes or apartments, a narrower wall with vertical design elements can create height without overwhelming the space. If you’re building around a fireplace, ensure proper heat management. Electric fireplaces are typically safer and easier to integrate beneath televisions compared to gas units, which require ventilation and heat deflection planning.
Step Three: Select Your Media Wall Style
Your media wall should complement your home’s interior design. Modern homes often favor clean lines, matte finishes, and concealed storage. Traditional spaces may incorporate wood paneling, molding details, or symmetrical built-ins. Industrial interiors can embrace metal accents, textured brick veneers, and darker palettes.
For budget-conscious projects, paint is a powerful design tool. A bold accent color behind the TV creates visual depth and contrast. Adding inexpensive slat panels or peel-and-stick wood planks can introduce texture without major expense.
Mid-range builds might include shaker-style cabinets, floating consoles, or stone veneer panels. Premium installations can feature custom millwork, seamless plaster finishes, LED backlighting integrated into recessed channels, and acoustic paneling disguised as décor. The key is cohesion. Every material, finish, and lighting element should feel intentional and unified.
Step Four: Plan Storage and Functionality
A stunning media wall is as practical as it is beautiful. Think about how you use your entertainment space. Do you need hidden storage for gaming consoles, routers, and streaming devices? Do you want open shelving for décor and books? Are speakers part of your system?
Built-in cabinets create a polished appearance while hiding clutter. Floating shelves offer flexibility and lighter visual weight. Modular storage systems are ideal for renters or those working within a modest budget.
Cable management is non-negotiable. Use in-wall cable kits or surface-mounted raceways painted to match the wall. Visible wires instantly reduce the sophistication of a design. Ventilation is another critical factor. Electronics generate heat, so ensure airflow through cabinet backs or vented panels to prevent overheating.
Step Five: Incorporate Lighting for Dramatic Impact
Lighting is what elevates a media wall from functional to spectacular. Even the simplest installation benefits from layered illumination. LED strip lights placed behind the television create a halo effect known as bias lighting, which reduces eye strain and enhances contrast perception.
Under-shelf lighting highlights decorative objects and adds dimension. Recessed spotlights or directional wall lights can emphasize textures such as stone or wood panels. Smart lighting systems allow color changes and dimming options, transforming your living room into a true home theater atmosphere.
On a small budget, adhesive LED strips offer affordable visual enhancement. For mid-range builds, consider aluminum channels for a cleaner finish. High-end installations may integrate fully concealed LED tracks within millwork for seamless glow effects.
Step Six: Add Texture and Architectural Detail
Flat walls rarely captivate on their own. Introducing depth through texture creates visual interest and makes your media wall feel intentional rather than improvised.
Budget-friendly options include painted MDF panels arranged in geometric patterns, peel-and-stick wallpaper, or vertical wood slats. These materials can be installed without extensive carpentry skills.
Stone veneers, marble-effect panels, and custom wood paneling elevate the aesthetic further. Acoustic slat panels have become particularly popular, offering both sound dampening and modern design appeal. If your ceiling height allows, extending materials from floor to ceiling creates a dramatic, built-in effect that makes even modest spaces feel upscale.
Step Seven: Integrate a Fireplace (Optional but Impactful)
A fireplace beneath a television has become a signature feature of contemporary media walls. Electric fireplaces are the most accessible option across all budget levels. They require minimal structural modification and can be recessed into stud walls for a flush appearance.
On a limited budget, wall-mounted electric fireplaces provide warmth and ambiance without construction. For mid-range projects, recessed linear fireplaces framed with stone or tile create a luxury aesthetic. Premium builds may include custom mantels, integrated shelving, and smart temperature controls. When combining a fireplace and television, maintain safe clearance guidelines and ensure the TV is mounted at a comfortable viewing height.
Step Eight: Upgrade Audio for a True Entertainment Experience
While visuals dominate attention, audio quality defines the immersive experience. Even on a tight budget, upgrading from built-in TV speakers to a soundbar significantly improves performance.
Mid-range budgets allow for multi-speaker surround sound systems with discreet wiring. High-end builds may include in-wall speakers and acoustic treatments integrated into the design. Position speakers strategically and avoid enclosing them tightly within cabinets, as this can distort sound. If aesthetics are a priority, choose speakers that blend with the wall finish or install fabric panels that conceal them.
Step Nine: Focus on Proportion and Scale
Balance is crucial in media wall design. Oversized shelves can dwarf a television, while a tiny console beneath a large screen looks disproportionate. Measure carefully and sketch your layout before purchasing materials.
Maintain symmetry if your style leans traditional, or embrace intentional asymmetry for modern aesthetics. Leave negative space to prevent visual clutter. A media wall should feel curated, not crowded.
Height placement is equally important. Mount the television at eye level when seated, typically around 42 to 48 inches from the floor to the center of the screen.
Step Ten: Keep It Flexible for Future Upgrades
Technology evolves rapidly. Design your media wall with adaptability in mind. Leave space for larger televisions, future gaming consoles, or upgraded sound systems. Modular shelving, removable panels, and accessible wiring channels simplify future modifications. Investing in flexibility today prevents costly renovations later.
Budget Breakdown: What to Expect at Different Price Points
A basic DIY media wall using paint, floating shelves, and LED lighting might cost a few hundred dollars. Adding MDF paneling and a quality mount can bring the total to under $1,000.
Mid-range installations featuring cabinetry, electric fireplaces, stone veneers, and smart lighting systems often range between $2,000 and $5,000 depending on material selection.
Premium custom media walls with professional carpentry, integrated fireplaces, acoustic panels, and full lighting automation can exceed $10,000. However, the return on visual impact and property value can justify the investment. Regardless of budget, thoughtful design matters more than raw spending.
DIY vs. Professional Installation
If you are comfortable with basic carpentry, painting, and mounting techniques, a DIY media wall can be highly rewarding. There are extensive tutorials available for framing walls, installing paneling, and running cables safely.
However, electrical modifications, structural changes, or complex cabinetry may require licensed professionals. Improper installation can compromise safety, particularly when dealing with fireplaces or heavy stone materials. Assess your skill level honestly and choose the approach that balances ambition with safety.
Common Mistakes to Avoid
One of the most common errors is mounting the television too high. Another frequent mistake is neglecting cable planning, resulting in visible wires. Overcrowding shelves with excessive décor can also diminish impact. Avoid mixing too many materials or colors. A cohesive palette typically delivers a more sophisticated result. Finally, ensure all materials can support the weight of mounted electronics and shelving.
The Final Touch: Styling Your Media Wall
Once construction is complete, styling brings personality to the space. Incorporate a mix of decorative objects, framed art, plants, and books. Use varying heights and textures to create depth. Keep décor minimal and intentional. Neutral color palettes create timeless elegance, while bold accents can energize the room. Integrate textiles such as rugs and cushions that complement the wall design to create a cohesive environment.
Transform Any Space Into a Showpiece
Building a stunning media wall on any budget is achievable with strategic planning and creative execution. From simple painted backdrops with LED accents to fully integrated architectural installations, the possibilities are expansive. By prioritizing proportion, lighting, storage, and cohesive design, you can create a focal point that enhances both entertainment and everyday living. A media wall is more than a place to mount a television—it is an opportunity to redefine your living space. With the right approach, even the most modest budget can yield a result that feels custom, intentional, and undeniably impressive.
TV Top 10 Product Reviews
Explore Philo Street’s TV Top 10 Product Reviews! Discover the top-rated TVs, accessories, streaming devices, and home theater gear with our clear, exciting comparisons. We’ve done the research so you can find the perfect screen and setup for your entertainment experience!